Ever find yourself needing to quickly grab a screenshot? Whether it’s a funny meme, an error message for tech support, or just some info you want to share, screenshots are super handy. Let’s explore some great ways to do this directly in your Chrome browser.
Method 1: Using the Nimbus Screenshot Extension
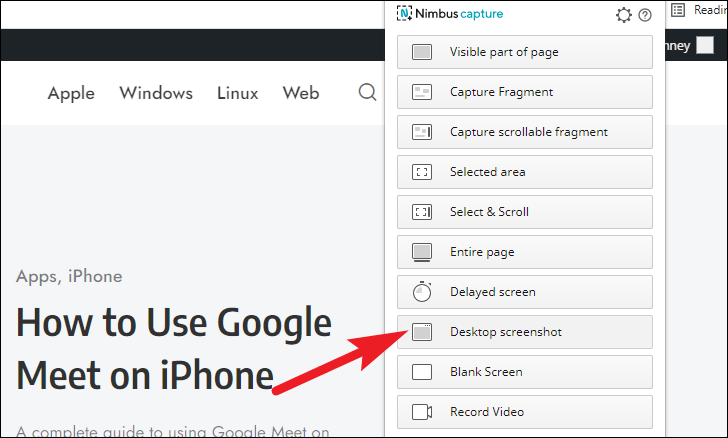
The “Nimbus Screenshot & Screen Video Recorder” extension is a powerhouse for capturing screenshots. It allows you to capture full pages, specific areas, delayed shots, and even record your screen if needed. Plus, it has built-in editing and cloud storage upload options making it quite convenient. Let’s get started by adding it to Chrome.
Adding the Nimbus Extension
First, you need to install the extension from the Chrome Web Store:
-
Open Chrome on your computer (Windows or macOS).
-
Go to chrome.google.com/webstore and search for
Nimbus. HitEnterto start the search. -
Click on “Nimbus Screenshot & Screen Video Recorder” in the search results.
-
Click “Add to Chrome” to install the extension.
-
In the pop-up, select “Add extension”.
-
The extension should now be visible on your Chrome menu bar. If it isn’t, click the “Extensions” icon then click the pin next to Nimbus to keep it visible.
Using Nimbus for Screenshots
Now that you have it installed, here’s how to use it:
-
Capture the Visible Page: Click the Nimbus icon, and choose “Visible part of page”. The screenshot will open in a new tab.
-
You can edit your screenshot using the built-in tools. They are pretty similar to MS Paint.
-
Click “Done” after editing.
-
You can then save the image, upload it to the cloud or print it.
-
Capture an Entire Scrolling Page: Click the Nimbus icon and select “Entire page”.
-
The extension will scroll down and capture the whole webpage. The screenshot will then open in a new tab.
-
Capture a Selected Area: Choose “Selected area” from the Nimbus menu.
-
Drag your mouse over the area you want to capture. Then, click on the tick icon to save, or the Edit icon to modify it, and the Cancel icon to select the area again.
-
Capture a Scrolling Selected Area: Select “Select & Scroll” from the menu.
-
Select the area by dragging your mouse and move the cursor downwards to scroll and capture the area, then click on edit or save.
-
Capture a Fragment: Select “Capture fragment” from the Nimbus menu.
-
Hover over the area you want to capture and click to select it.
-
Select ‘Edit’ to edit, ‘Tick’ to save, or ‘Cancel’ to discard.
-
Capture a Scrolling Fragment: Choose “Capture scrollable fragment”.
-
Click on the scrollable element to capture a scrolling screenshot.
-
Capture a Delayed Screenshot: Select “Delayed screen”.
-
A 3-second timer will appear before the screenshot is taken.
-
Capture your Desktop: Choose “Desktop screenshot”.

-
Select whether to capture a chrome tab, window or your entire screen. Then, click “Share”.
Changing Nimbus Behavior
By default Nimbus opens the screenshot in a new tab, but this can be changed:
-
Click the Nimbus icon and locate the “Action after capture” section.
-
Click the dropdown menu, then select the desired action.
Customizing Nimbus
You can also adjust settings to tailor Nimbus to your needs:
-
Click the Nimbus icon and then click the ‘gear’ icon in the top right corner.
-
This will open the settings page.
-
Under the “General” tab you can change default image extension. Nimbus supports
.PNGand.JPGformats. -
Under “Save Settings”, you can change the naming pattern for screenshots using available designations.
-
In the “Screenshot Settings” section, you can set the time delay for a scrolling screenshot, and toggle settings like URL/date on the print.
-
You can also customize the options in the main menu from the “Main Menu Settings” section.
-
Change shortcuts for taking screenshots using the “Hotkeys Settings” section.
-
You can find further options for Watermarks and screen recording in their respective tabs.
Method 2: Using Chrome’s Developer Tools
Chrome also has built-in screenshot functionality via the developer tools. Here’s how to use it:
-
Open Chrome and go to the page you want to capture.
-
Press
Ctrl+Shift+I(Windows) orOption+Command+I(macOS) to open the “Inspect Element” window. -
Press
Ctrl+Shift+P(Windows) orCommand+Shift+P(macOS) to bring up the developer tools search. -
Type ‘screenshot’ in the search bar to see the different capture options:
- Capture Screenshot: Captures the visible part of your screen.
- Capture Full Size Screenshot: Captures the entire scrolling page.
- Capture Area Screenshot: Allows you to draw an area to capture.
- Capture Node Screenshot: Captures an element by selecting it from the inspect element.
-
Click the desired option.
-
Chrome will automatically download the screenshot.


